11. 3D Printed Hollow Form Object: The Hybrid
The Eldritch Easter Egg
by Loren and Jordan
Behold, the Eldritch Easter Egg, our hybridization of two of our hollow forms. Together we combine two radical forms to an even more extreme form.

Below are the concepts we each made and chose from.
My Preliminary Concepts:


Jordan's Preliminary Concepts:


Choosing which forms to blend was difficult, mostly due to the fact that our forms were already so complex on their own. This meant we had to break things down and, after trying out some different ideas, discuss which direction we wanted to go. We both expressed our desire for a dynamic form that pushed both the boundaries of our 3D modeling abilities and the capabilities of the 3D printer itself. While Jordan valued the dynamicism and depth within the object, I was more interested in taking a more calm and symetrical approach. We were able to achieve this by implementing the two objects that coincided with these ideas.
Here are the models we chose to have combined.


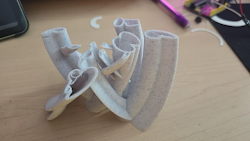
This was the outcome.

Side View

Bottom View
Realizing we shared the same vision for our design, we decided to add all the pieces together directly from our models. We took turns working on the final model and were both there to aid each other throughout the process. We started off by combing the two models directly into each other, and it turned out pretty well, but we knew that we could do a lot better. Seeing the first prototype reminded me of the World Cup trophy or some kind of dystopian building that had started growing plants. We started leaning into this idea by moving the roots out of the sphere and having it just lay on top, kind of like the Calgary Tower. Seeing that there was still a lot of room left, Jordan had the idea of making a copy of the sphere and stretching it to create variety and fill up some of the negative space. That is when we knew we had our final shape, so all we had to do was fix up some minor details and make it more printer-friendly. This is when we decided to look at it through a microscope and make sure everything was good.
Below are some images that show our thought process and the progression of our model.


After making sure everything was fine, we tried printing the model at home to see how it would turn out, and we realized there were a few minor issues that were easily fixed.
Below is the first prototype, which highlighted the areas that would have the hardest time printing. The quality is now good because it was printed using PETG. The second picture shows what happened when we tried scaling it up, and the print stopped for some reason we never got to the bottom of.


Overall, the experience was amazing. I loved working with Jordan, as he was incredibly understanding and encouraging when it came to my input and ideas. We were able to collaborate as a unit and get our model complete with great speed and efficiency. It also helped that our ideas for the final product were similar, which allowed us to have our design completed early, giving it more time for any needed changes to be made.
Here are some of our renders.


Comments
Post a Comment